Foundry
WORK IN PROGRESS
The Foundry is a tool housed within Blacksmithing zone and can only be used practically if you have the Blacksmithing auth, which is required to get a key to the blacksmithing building.
Safety
Gear
Working in a foundry is very dangerous! We provide safety gear to help reduce the odds of your getting hurt. To use the foundry, you must wear the following:
- Safety glasses, ideally shaded to protect your eyes
- Closed-toed shoes (steel toes aren't a bad idea)
- Long sleeves and pants in natural fibers (cotton, flannel). We recommend borrowing a welding shirt from Metalworking.
- Ear protection if the noise bothers you
- A face screen to protect your face (provided by KM)
- Leather heat-resistant spats to protect your shins and feet (provided by KM)
- Leather sleeves (provided by KM)
- Leather gloves (provided by KM)
- Leather apron (provided by KM)
Everything you do in the foundry must be very intentional. Place each step carefully, double check that no one is too close for your personal comfort (and their safety), move methodically and consistently when possible.
Fumes
Any time you heat up metal, you run the risk of releasing toxic fumes. It's important to know what metal you're using and what the signs suggest that you have inhaled the fumes. We pour outside the building in part to give fumes more room to disperse, but you should look out for smoke coming from the furnace and adjust your position or ventilation as needed. If you have one, you might like to wear a respirator. Below you'll find a few common types of fumes to beware of.
Zinc fumes
- Commonly released when casting metals like brass.
- Short-term exposure can cause flu-like symptoms (known as metal fume fever), nausea, headaches, and muscle aches.
- Long-term exposure may lead to chronic respiratory issues, such as asthma or other lung damage.
Carbon monoxide
- Released during incomplete combustion of fuels.
- Exposure can lead to dizziness, confusion, or even unconsciousness in severe cases.
- Long-term exposure can cause heart and brain damage due to oxygen deprivation.
Sulfur dioxide
- Released during the casting of metals like iron and copper.
- Short-term exposure can irritate the respiratory system, causing coughing, shortness of breath, and a burning sensation.
- Long-term exposure may lead to chronic lung disease or aggravation of pre-existing conditions like asthma.
Hydrogen chloride
- Released when metals like zinc or copper are cast.
- Causes severe irritation to the eyes, skin, and respiratory tract.
- Long-term exposure can result in chronic bronchitis or permanent lung damage.
Tools
- The furnace is the cylinder that contains the fire that melts your metal.
- The propane tank provides fuel for the fire.
- The crucible is the special container that will hold your metal while it melts. You'll pour from the crucible into your mold.
- The tongs are specially made to fit the crucible and should be used for lowering the crucible into the furnace and it out.
- The ring shank is the tool you'll use to pour the metal from the crucible. When pouring, you use the tongs to set the crucible into the ring of the ring shank, and then you pour from the ring shank.
- The cope and drags... (I DON'T REMEMBER. LET'S UPDATE.)
- The ingots are the metal you'll put into the crucible to melt. When you finish pouring into your molds, pour your leftover metal into an ingot tray to harden into useful shapes for inserting back into the crucible for a future pour.
- The sand table lives in the corner (near left as you enter the front doors) and is useful for making your molds and extracting your finished product from the molds. A bin underneath collects any sand you push through the holes on the surface so that it can be re-used later.
Environment Setup
Wheel the furnace out onto a flat surface just outside the front door of the blacksmith shop. There should be pavers set out that you can park the furnace on. Block the wheels with something that will prevent the furnace from moving (one day, we may add chucks or locking wheels).
There should be a propane tank near the furnace, but note that the propane tank should stay inside the shop door while the furnace should be outside the door. Think about how you'll move around the furnace with the tongs and molten metal. Here's a layout that worked well in testing:

Note that the furnace is sitting on pavers on the gravel. The propane tank is inside the shop. Between the propane and the furnace are the tongs for lifting the crucible out of the furnace. Lying on pavers in the middle of the photo are the pouring tongs. At right is a sheet of metal that you'll set your molds on to pour into. In the upper right corner of the metal is a mold to pour any leftover metal into so that we can melt it down again for a future pour. This arrangement lets you maneuver from furnace to tongs to pouring area with a reduced likelihood of getting tripped up.
Now that you've got your layout set up, we get the furnace ready for melting!
- Make sure that both doors on the blacksmith shop are open.
- Ensure that the furnace is on the outside on the pavers, and the gas is on the inside of the door, as mentioned and depicted above. This is a safety issue.
- Connect the furnace gas supply to the propane tank. Remember that the threads are reversed (so twist backwards from what you normally would). Ensure that the valve is tightened properly, passed visual inspection, and appears undamaged. If uncertain, please ask. Folks familiar with the foundry chat in our Foundry and Blacksmithing channels on Mattermost.
- Open the furnace (TODO: VIDEO LINK HERE) and load the crucible (see photo below). Your metal should be in the crucible. Use the correct crucible for the metal being used.
- Turn on the propane tank to 10 psi.
- Light the furnace using the hand-held propane torch.
- Close the furnace lid.
It'll vary by metal, but you should plan for a half hour or so to get the metal melting (this is the case for aluminum, at least). While the metal is heating, you can prepare your molds.
To open the lid on the furnace, grab the handle at the top and push your foot down on the pedal at the base of the furnace. Then gently pivot the top around to the side of the furnace. Remember to block the wheels first so the furnace doesn't roll. You should find three little pucks in the bottom as pictured below. Space them out equally in the center of the furnace in a position that will allow the base of the crucible to rest securely on the pucks without tipping. Before putting the crucible into the furnace, put a sheet of cardboard or paper towel on top of the pucks. This provides a layer of carbon between the crucible and pucks that will reduce the likelihood of the pucks sticking to the bottom of the crucible.
Use the pick-up tongs to lift the crucible carefully and lower it in to balance on the pucks.

Preparing Molds
On the sand table, you'll find some square wooden molds. While there are various ways to make molds in sand, the method we use for the authorization uses a plastic mold with sand packed tightly around it. To get your sand casting mold ready, follow these steps:
- Near the sand table, you'll find a bin of our sand, which is a mixture (not straight sand) designed for casting. Dig through this and stir it up a bit so that you can get some handfuls of sand that will pack into a nugget that doesn't readily crumble. There's not an exact way to determine that you've got the right consistency. In the auth class, you'll get to try this out to get an idea. So, step one s to have your sand ready to go.
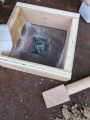
- Select one of our pre-printed plastic molds or create a design of your own.
- Place this into one of the wooden frames with the design facing upward toward you on the table.
- Dust it with a bit of talcum powder, which helps the cooled metal release from the mold later. You can put a little powder on top of the mold and then brush it around a little. You want a very light dusting.
- Put some sand into the mold and pack it into the frame using one of the wooden rammers. You want a pretty tight pack. Do this in layers rather than dumping a bunch of sand in and trying to pack it all at once.
- Once the sand is well packed and level with the top of the frame, carefully turn it upside down. You should see the bottom of your plastic mold.
- Very gently tap the mold to help it release.
- In our pre-printed molds, there's a tiny hole in the back. You can gently put a screw into this and tighten just enough to help you lift the plastic out of the sand. If you're making your own molds, devise a way to aid removal.
- Now look at the impression the mold has left in the sand. If it doesn't look right, you can redo the process until you get a "clean" impression to pour the metal into.
- Place your frame on the metal sheet you've set out for that purpose (see Setup above).
Pictures showing different steps/states in this process appear below.
-
 Plastic mold inside wooden frame
 -
 A mold with a light dusting of talcum powder, sitting inside a frame
 -
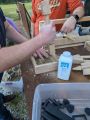 Ramming sand into the frame
 -
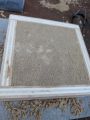 A sand-filled frame with mold pressing up into underside
 -
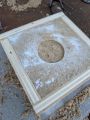 The mold completed


Skimming Dross
TODO
Pouring the Metal
So, you've got your environment set up and your casting frame ready to pour metal in.
Look again at the suggested setup above. Think about how you'll open the furnace, get the tongs to hand, transfer to the ring shank, pour, and reverse the steps. Think about how you'll maneuver safely without damaging yourself, others, and our equipment and shop.
The steps are as follows:
- Turn the psi on the propane tank down to 5 while pouring.
- Open the furnace by stepping on the pedal and using the handle to swing the top out to the opposite side of the furnace from where you'll be pouring.
- Use the tongs to carefully lift the crucible from the furnace. Make sure you clear the rim of the furnace, and watch out for tripping hazards.
- If you follow the setup suggested above, you'll have the ring and the handle of the ring shank both sitting on pavers. Use the tongs to place the crucible into the ring of the ring shank, sitting on the paver. Make sure to orient the pouring lip of the crucible so that it is toward the mold(s) you'll be pouring into.
- Move the tongs out of your way.
- Use the ring shank to pick up the crucible, making sure the crucible is held securely.
- Pour gently into the frame. A controlled pour will reduce the odds of your splashing molten metal and will conserve metal.
- Use the ring shank to place the crucible back down on the paver.
- Use the tongs to lift the crucible and place it back into the furnace, making sure that the crucible sits securely on the pucks in the bottom.
- Close the lid of the furnace.
- Turn the psi back up to 20 if you plan to continue pouring for a while yet.
Here's a video of this in action:
TODO: FIGURE OUT WHERE TO UPLOAD VIDEO TO AND LINK HERE
Extracting the Casting
TODO
Shutting Down
TODO
Sourcing Metal
Please do not melt aluminum cans in the furnace. TODO
