3D Printing - How To Print Extrusion Style
This page is meant to give details on how to print using the Extrusion style printers (often referred to as FDM or Fused Deposition Modeling).
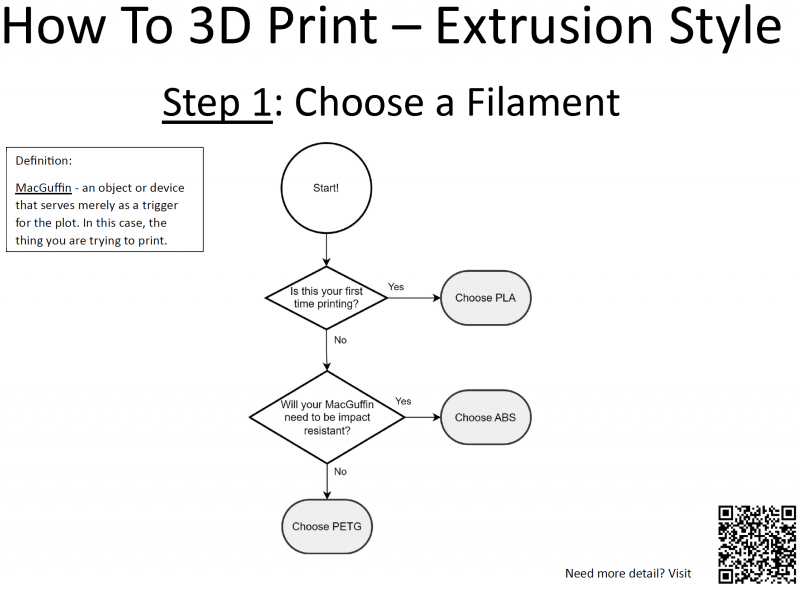
Step 1: Choose a Filament
Choosing a filament is an important first step when you wish to print something. Below is a basic flow chart to help beginners choose which filament to pick.
What is ABS, PLA, and PETG? They are different types of plastics. In the same way that a plastic food storage container differs from a plastic keyboard, different filaments have different properties such as stiffness, impact resistance, heat resistance, etc. At Knox Makers we try to support ABS, PLA, and PETG with our printers. You can find rolls of each hanging in our filament station in the 3D printing zone (free for all members to use). If you are curious to learn more about the properties of various filaments, there are several external sites that give much more detail such as simplify3d.com and prusa3d.com.
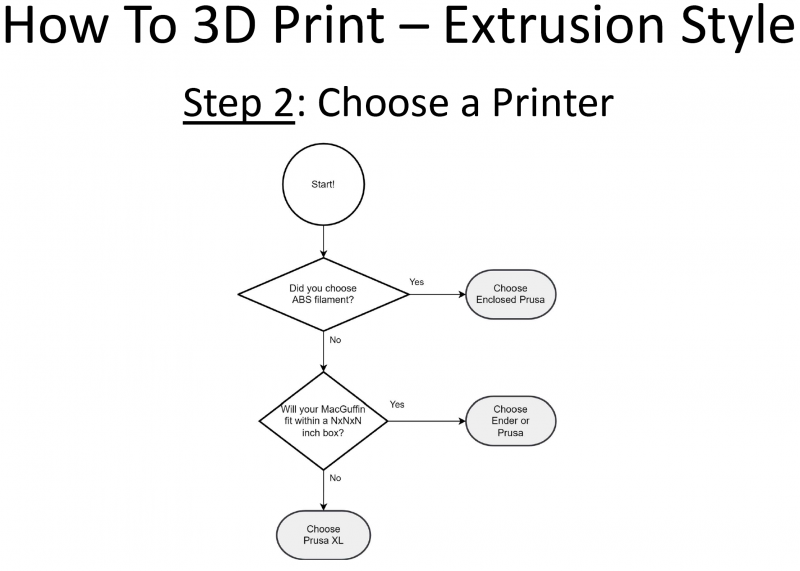
Step 2: Choose a Printer
Step 3: Prep Your MacGuffin
Follow the steps outlined corresponding to your chosen printer (from Step 2)
XL
- Import
- Size
- Position
- Orientate
- Tune Filament and Printer Settings
- Add Supports
- Tune Supports
- Output
Ender
- Import
- Size
- Position
- Orientate
- Tune Filament and Printer Settings
- Add Supports
- Tune Supports
- Output
Prusa Mk 3
- Import
- Size
- Position
- Orientate
- Tune Filament and Printer Settings
- Add Supports
- Tune Supports
- Output
Step 4: Prep and Print
Follow the steps outlined corresponding to your chosen printer (from Step 2)
XL
- Display Your Contact Info Near Printer (MatterMost username) and Date / Time When You Intend To Return
- Clean Print Bed
- Load Filament
- Load MacGuffin
- Start Print
Ender
- Display Your Contact Info Near Printer (MatterMost username) and Date / Time When You Intend To Return
- Clean Print Bed
- Load Filament
- Load MacGuffin
- Start Print
Prusa Mk 3
- Display Your Contact Info Near Printer (MatterMost username) and Date / Time When You Intend To Return
- Clean Print Bed
- Load Filament
- Load MacGuffin
- Start Print
Step 5: Cleanup
- Remove MacGuffin from Print Bed
- Clean Print Bed
- Unload Filament and Return To Filament Station
- Remove Your Contact Info


